


Every shift should start the same way: with a thorough pre-operational inspection. Five minutes of careful checking can prevent hours of downtime, thousands in repairs, and most importantly, serious injuries. At Deister Concentrator, we've built tables for over a century, and we know that safe operation starts before you ever flip the switch.
Why These Checks Matter
Your concentrating table has suspended decks, precision bearings, high-stress connection points, and moving parts operating under tremendous cyclical loads. Components that look fine can be one shift away from failure. A systematic inspection catches problems early, when they're easy to fix rather than dangerous to operate.
Essential PPE: Your First Line of Defense
Before approaching your table, gear up properly:
- Safety glasses with side shields - Mineral particles and slurry splashes are constant hazards
- Steel-toed, slip-resistant boots - The area around tables stays wet; proper footwear prevents slips and protects feet
- Chemical-resistant gloves - Even naturally occurring minerals can contain hazardous elements
- Hearing protection - Required in most processing plant environments
- Waterproof coveralls - Keeps you dry and prevents skin contact with process materials
The Critical Five: Your Daily Safety Inspection
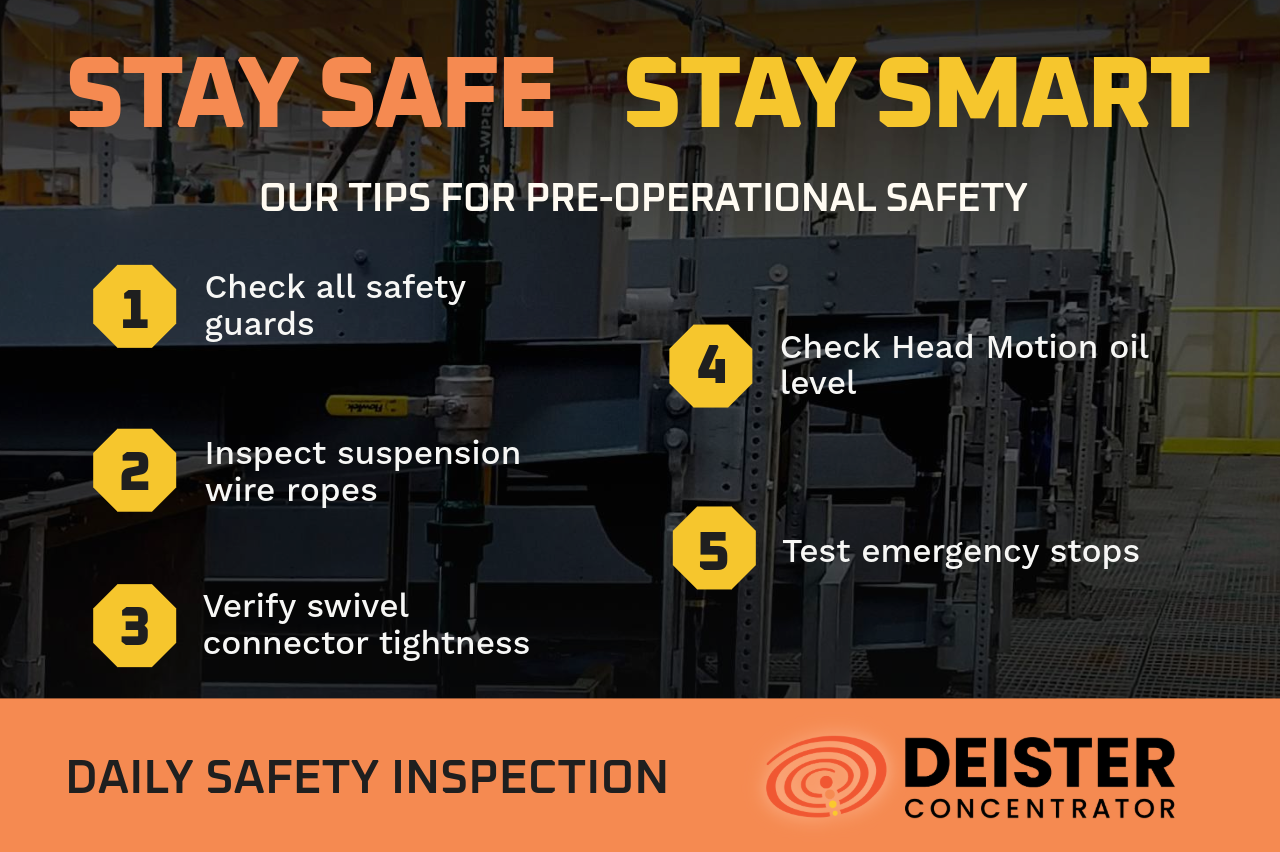
1. Check All Safety Guards
What to inspect: Drive guard and belt guard installation and condition.
Why it matters: A failed V-belt whips with tremendous force. Missing guards expose moving parts that can catch clothing or cause serious injury.
Action: Give each guard a firm shake. All mounting bolts should be tight with no sections damaged or missing. If any guard is loose or damaged, tag the table "DO NOT OPERATE" until repaired. Never operate without proper guards in place.
2. Inspect Suspension Wire Ropes
What to inspect: All suspension wire ropes for fraying, broken strands, or damage at attachment points.
Why it matters: Wire ropes support the entire weight of your suspended deck assemblies. A failed rope causes catastrophic deck collapse and serious injury risk.
Action: Check each rope carefully along its entire length, paying special attention to attachment points and areas where the rope passes through hardware.
Replace immediately if you see:
- Any broken or frayed strands
- Visible reduction in rope diameter (wear)
- Kinks or bird-caging (strands separating)
- Rust or corrosion at attachment points
Don't wait on wire rope issues—failure is not a matter of if, but when. Keep replacement wire ropes in stock so you're not waiting days for critical parts when inspection reveals wear.
3. Verify Swivel Connector Tightness
What to inspect: Motion-to-deck swivel connectors for looseness or wear.
Why it matters: Swivel connectors are the most highly stressed part of your concentrating table. These endure tremendous cyclical stress during operation and wear over time.
Action: Check each swivel connector by placing your hand on top during a brief test run or while stationary. If the ball bearing or shaft feels loose, it indicates wear. Loose swivel connectors must be replaced immediately—this is not something you can monitor and fix later. Stock replacement swivel connectors to minimize downtime when replacement is needed.
Inspection schedule: Check weekly during regular operation and before every startup after an extended shutdown.
4. Check Head Motion Oil Level
What to inspect: Oil level in the sight gauge when the head motion is at rest.
Why it matters: Insufficient oil causes bearing failure. The head motion contains precisely balanced components and gears that require constant lubrication to operate safely.
Action:
- Locate the sight gauge on the head motion housing
- Verify oil reaches the acceptable level indicated
- Use only the recommended 10W30 motor oil—heavier oils will cause lubrication failure
- Check for leaks around gaskets and seals
- Add oil through the breather cap if levels are low, but never overfill
5. Test Emergency Stops
What to inspect: Location and functionality of all emergency stop buttons.
Why it matters: In an emergency, every second counts. Operators must be able to reach e-stops immediately without searching.
Action: Verify you know where all emergency stop buttons are located. During supervised testing, confirm each button moves freely and functions properly. Report any sticky, binding, or damaged e-stops immediately—these are life-safety devices.
Quick Visual Checks
Walk completely around your table, checking:
- Work area clear - No tools, materials, or obstructions within the table perimeter
- Deck surface - No cracks, loose riffles, or foreign objects
- Feed box liner - Rubber liner intact (replace when worn to prevent damage)
- Launders positioned - Close enough to catch discharge but not interfering with table movement
- Tilting mechanisms - Hand wheels turn smoothly without binding
- Belt condition - No cracks, fraying, or excessive wear on drive belts
Before You Start the Motor
Before starting under power, manually rotate the head motion by turning the flywheel—it should turn smoothly without binding or unusual resistance. Start the motor and verify the top of the flywheel runs away from the table deck (correct rotation direction). Run empty for 2-3 minutes, listening for unusual sounds or vibrations. If you hear grinding, knocking, or see excessive vibration, shut down immediately and investigate.
Make It a Habit
Pre-operational inspections only work when done consistently and thoroughly. Don't skip them when you're busy, short-staffed, or behind schedule—those are exactly the times when inspection matters most.
When inspection reveals damaged components, order replacements immediately. Don't wait until the part fails completely or you're forced into an emergency shutdown. Worn wire ropes, cracked guards, loose swivel connectors, or frayed belts will only get worse—order replacement parts as soon as wear is detected so they're on hand before failure occurs. Tag equipment appropriately and replace parts promptly to avoid turning routine maintenance into costly emergency repairs.
Keep critical spare parts on hand to avoid extended downtime when wear items need replacement. View our parts diagrams and contact our team to build your maintenance inventory.
